
NOCO GENIUS5 5A Fully Automatic Smart Charger

Introduction
The NOCO GENIUSPRO50 represents some of the most innovative and advanced technology on the market, making each charge simple and easy. It is quite possibly the safest and most efficient charger you will ever use. The GENIUSPRO50 is designed for charging all types of 6V, 12V and 24V lead-acid batteries, including Wet (Flooded), Gel, MF (Maintenance-Free), CA (Calcium), EFB Enhanced Flooded Battery), and AGM (Absorption Glass Mat), in addition to 6V, 12V and 24V Lithium (LiFePO4) batteries.
It is suitable for charging battery capacities up to 2000 Amp-Hours (6V and 12V), 1000 Amp-Hours (24V) and maintaining all battery sizes. Before using the charger, carefully read the battery manufacturer’s specific precautions and recommended rates of charge for the battery. Make sure to determine the voltage and chemistry of the battery by referring to your battery owner’s manual prior to charging.
Safety Instructions
- Electrical Shock. A product is an electrical device that can shock and cause serious injury. Do not cut power cords. Do not submerge in water or get wet.
- Explosion. Unmonitored, incompatible, or damaged batteries can explode if used with the product. Do not leave the product unattended while in use. Do not attempt to charge a damaged or frozen battery. Use the product only with batteries of the recommended voltage. Operate the product in well-ventilated areas.
- Fire. A product is an electrical device that emits heat and is capable of causing burns. Do not cover the product. Do not smoke or use any source of electrical spark or fire when operating the product. Keep the product away from combustible materials.
- Eye Injury. Wear eye protection when operating the product. Batteries can explode and cause flying debris. Battery acid can cause eye and skin irritation. In the case of contamination of the eyes or skin,
Flush the affected area with running clean water and contact poison control immediately. - Explosive Gases. Working in the vicinity of a lead-acid battery is dangerous. Batteries generate explosive gases during normal battery operation. To reduce the risk of battery explosion, follow all safety information instructions and those published by the battery manufacturer and the manufacturer of any equipment intended to be used in the vicinity of the battery. Review cautionary markings on these products and on the engine.
Mounting
It is important to keep in mind the distance to the battery. The DC cable length from the charger, with either the battery clamp or eyelet terminal connectors, is approximately 72 inches (182.88cm). Allow for 12 inches (30.4cm) of slack between connections.
Proposition 65
Battery posts, terminals, and related accessories contain chemicals, including lead. These materials are known to the State of California to cause cancer and birth defects, and other reproductive harm.
Minors
If the product is intended by “Purchaser” to be used by a minor, the purchasing adult agrees to provide detailed instructions and warnings to any minor before use. Failure to do so is the sole responsibility of the “Purchaser,” who agrees to indemnify NOCO for any unintended use or misuse by a minor.
Handling
Handle the product with care. The product can become damaged if impacted. Do not use a damaged product, including, but not limited to, cracks to the casing or damaged cables. Do not use the product with a damaged power cord. Exposure to humidity and liquids may damage the product. Store and operate products in dry locations. Do not allow the hanger to remain wet. Do not disconnect the product by pulling on the cables.
Modifications
Do not attempt to alter, modify or repair any part of the product. Disassembling the product may cause injury, death or property damage. If the product becomes damaged, malfunctions or comes in contact with any liquid, discontinue use and contact NOCO. Any modifications to the product will void your warranty.
Accessories
This product is only approved for use with NOCO accessories. NOCO is not responsible for user safety or damage when using accessories not approved by NOCO.
Location
Prevent battery acid from coming in contact with the product. Do not operate the product in a closed-in area or an area with restricted ventilation. Do not set a battery on top of the product. Position cable leads to avoid accidental damage by moving vehicle parts (including hoods and doors), moving engine parts (including fan blades, belts, and pulleys), or what could become a hazard that may cause injury or death.
Operating Temperature
This product is designed to work in ambient temperatures between -4° F and 122° F (-20° C and 50° C). Do not store or operate outside of the specified temperature ranges. Do not charge a frozen battery. Discontinue use of the product immediately if the battery becomes excessively warm.
Storage
Do not use or store your product in areas with high concentrations of dust or airborne materials. Store your product on flat, secure surfaces so it’s not prone to falling. Store your product in a dry location. The storage temperature is -30ºC – 60ºC (average temperature). Never exceed 80ºC under any condition.
Compatibility
The product is only compatible with 6-volt, 12-volt and 24-volt Lead-Acid, AGM, and 6-volt, 12-volt and 24-volt Lithium batteries. Do not attempt to use the product with any other type of battery. Charging other battery chemistries may result in injury, death or property damage. Contact the battery manufacturer before attempting to charge the battery. Do not charge a battery if you are unsure of the battery’s specific chemistry or voltage.
Medical Devices
The product may emit electromagnetic fields. The product contains magnetic components which may interfere with pacemakers, defibrillators, or other medical devices. These electromagnetic fields may interfere with pacemakers or other medical devices. Consult with your physician before use if you have any medical devices, including pacemakers. If you suspect the product is interfering with a medical device, stop using the product immediately and consult your physician.
Cleaning
Power off the product before attempting any maintenance or cleaning. Clean and dry the product immediately if it comes in contact with liquid or any type of contaminant. Use a soft, lint-free (microfiber) cloth. Avoid getting moisture in openings.
Explosive Atmospheres
Obey all signs and instructions. Do not operate the product in any area with a potentially explosive atmosphere, including fueling areas or areas which contain chemicals or particles such as grain, dust or metal powders.
High-Consequence
Activities. This product is not intended for use where the failure of the product could lead to injury, death or severe environmental damage.
Radio Frequency Interference
The product is designed, tested, and manufactured to comply with regulations governing radio frequency emissions. Such emissions from the product can negatively affect the operation of other electronic equipment, causing it to malfunction.
Features
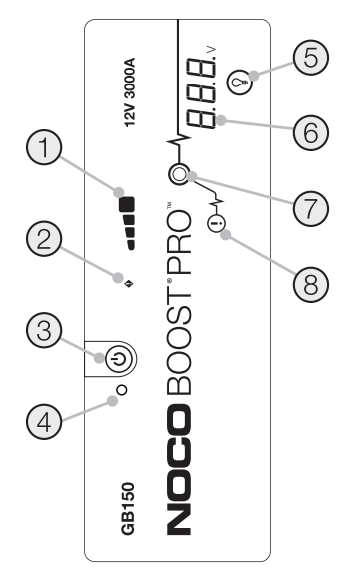
- Internal Battery Level indicates the charge level of the internal battery.
- Error LED Illuminates Red if reverse polarity is detected, or blinks “On” and “Off” when the internal battery temperature is too high.
- Power Button Push to turn unit “On” & “Off”.
- Power LED Illuminates White when the unit is “On”.
- Light Mode Button Toggles the ultra-bright LED light through 7 light modes: 100% > 50% > 10% > SOS > Blink > Strobe > Off.
- Voltmeter. The built-in voltmeter reads the voltage of the vehicle’s battery for enhanced diagnostics and troubleshooting.
- The voltmeter will automatically read the voltage of any battery (or battery system) when the battery clamps are connected, even if the unit is powered off. The voltmeter will read voltage between ~3V and ~20V. If the connected battery is below 3V, nothing will display.
- Boost LED Illuminates White when Boost is active.
- Manual Override Button: To enable, push and hold for three (3) seconds.

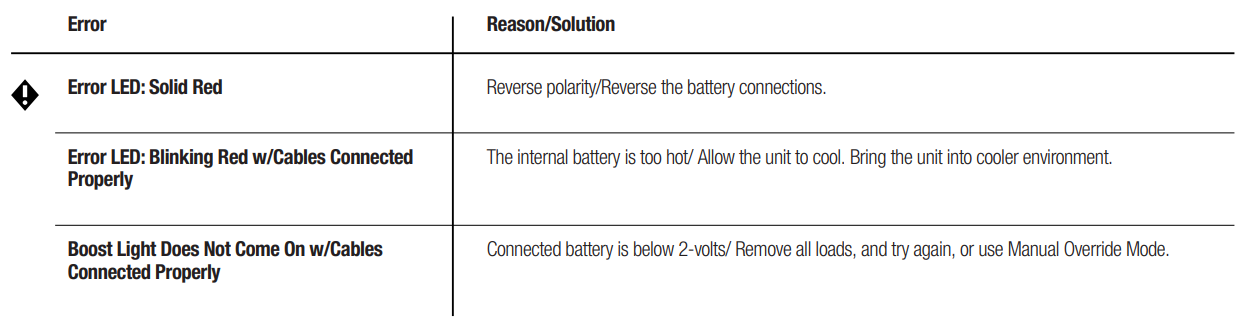
Troubleshooting
Technical Specifications
- Internal Battery: Lithium Ion
- Peak Current Rating: 3000A
- Operating Temperature: -20°C to +50°C
- Charging Temperature: 0ºC to +40ºC
- Storage Temperature: -20ºC to +50ºC (Avg Temp.)
- Micro USB (Input): 5V, 2.1A
- USB (Output): 5V, 2.1A
- 12V (Input): 12V, 5A
- 12V (Output): 12V, 15A
- Housing Protection: IP65 (w/Ports Closed)
- Cooling: Natural Convection
- Dimensions (L x W x H): 12.3 x 7 x 2.7 Inches
- Weight: 7.5 Pounds
Warranty
NOCO One (1) Year Limited Warranty
NOCO warrants that this product (the “Product”) will be NOCO GB150 3000A Lithium Jump Starter free from defects in material and workmanship for a period of one (1) year from the date of purchase (the “Warranty Period”). For defects reported during the Warranty Period, NOCO will, at its NOCO GB150 3000A Lithium Jump Starter discretion, and subject to NOCO’s technical support analysis, either repair or replace defective Products. Replacement parts and products will be new or serviceably used, comparable in function and performance to the original part and warranted for the remainder of the original Warranty Period.
THIS LIMITED WARRANTY DOES NOT COVER: (1) NOCO GB150 3000A Lithium Jump Starter normal wear and tear; (2) cosmetic damage that does not affect functionality; or (3) Products where the NOCO serial number is missing, altered, or defaced. You may register your NOCO product online at: no.co/register. If you have any questions regarding your warranty or product, contact NOCO Support (email and phone number above) or write to: The NOCO Company, at 30339 Diamond Parkway, #102, Glenwillow, OH 44139 USA.
Customer Support
- Website: https://no.co/support
- Ph: 1.800.456.6626
FAQs
Q: What batteries can the GENIUS5 charge?
It is compatible with 12V LiFePO4 batteries and 12V lead-acid batteries (wet, AGM, gel, and maintenance-free). Unless specifically stated by the battery manufacturer, other lithium chemistries are not advised.
Q: Can I leave the charger connected long-term?
Indeed. Because of its automated maintenance/float mode, which guards against overcharging, the GENIUS5 is safe to use for an extended period of time to maintain batteries charged.
Q: Can the GENIUS5 revive a dead battery?
Indeed. Deeply depleted batteries may be restored to 1V using the Repair/Recondition Mode. Batteries with severe damage might not entirely recover.
Q: Can I charge multiple batteries at once?
No, one battery at a time is what the GENIUS5 is made to do.
Q: Can it be used outdoors?
Although it is IP65 splash-resistant, it shouldn’t be completely submerged. Use in a dry, protected environment at all times.
Q: Can I charge a battery while it’s installed in a vehicle?
Indeed. As long as the battery terminals are reachable and the space is well-ventilated, the GENIUS5 can be safely charged inside a car.
Q: Can it charge lithium batteries?
Yes. The GENIUS5 can be safely charged inside a car as long as the battery terminals are within reach and the area is well-ventilated.
Q: Does it need an external fuse?
There is internal protection for the charger. It is advised to incorporate an inline fuse for direct mount installations in order to safeguard the battery and cabling.
136 Comments
Pingback: CACTUS CAC-119 KidoCall Smartwatch Phone User Instructions
Pingback: INSIGNIA NS-UZ7WH0 7 Cu. Ft. Upright Freezer User Manual
Pingback: INSIGNIA NS-CH1IPC8 Wi-Fi Camera Instruction Manual
Pingback: INSIGNIA NS-CH1XIS8 Smart In-Wall Switch User Manual
Pingback: INSIGNIA NS-AC10PWH8 Portable Air Conditioner User Manual
Pingback: INSIGNIA NS-AC14PWH8 Air Conditioner User Manual
Pingback: INSIGNIA NS-WC24BK6 Bottle Beverage Cooler User Manual
Pingback: INSIGNIA NS-CF43SS6 4.3 Cubic Refrigerator User Manual
Pingback: INSIGNIA NS-MW12SS6 1.2 Cu. Ft. Microwave Oven User Manaul
Pingback: INSIGNIA NS-DWR3SS1 Top Control Dishwasher User Manual
Pingback: INSIGNIA NS-DWH2BS8 Top Control Dishwasher User Manual
Pingback: Clarke CAG2350C Angle Grinder Operating Instruction Manual
Pingback: Bang & Olufsen Beosound A9 5th Gen Speaker User Guide
Pingback: Bang & Olufsen Beosound 2 3rd Gen WiFi Speaker User Guide
Pingback: Bang & Olufsen Beocom EX Wireless Headphones User Guide
Pingback: Bang & Olufson Beosound A1 2nd Gen Speaker User Manual
Pingback: BLINK DCFC 160kW Fast Charging Station User Instructions
Pingback: Bang & Olufsen Beosound Emerge WiFi Speaker User Guide
Pingback: Bang & Olufsen Beosound Theatre Dolby Atmos Soundbar Manual
Pingback: INSIGNIA NS-AC10P6WH Conditioner Instruction
Pingback: Bang & Olufsen Beosound Explore Charging Instruction Guide
Pingback: Blink IQ 200 Electric Charging Station Instruction Manual
Pingback: Blink IQ 200 Level 2 AC EVSE Charging Station User Manual
Pingback: Bang & Olufson 1200578 Beosound-Stage-Soundbar User Guide
Pingback: Blink XT2 XT Indoor & Outdoor Camera Instruction Manual
Pingback: Blink Focos Sports Tracking Gimbal Instruction Manual
Pingback: Bang & Olufson Beoplay H4 2nd Gen Headphone User Manual
Pingback: OTOFIX D1 Pro Bi-Directional Car Diagnostic Tool User Manual
Pingback: OTOFIX D1 Plus Diagnostics Tool Car Scanner User Manual
Pingback: Pioneer SPH-DA77DAB System Firmware Update Instructions
Pingback: Mac Audio PRO FLAT 2.20 Component Speakers User Manual
Pingback: CAD-Audio WX1000BP Wireless Microphone System User Manual
Pingback: CAD-Audio MH400 Sessions Headphone User Instructions
Pingback: Honeywell HCE870 SERIES Ceramic Heater Instruction Manual
Pingback: Honeywell CL30XC Portable Air Cooler Instruction Manual
Pingback: Honeywell TH3110D1008 Digital Thermostat User Instructions
Pingback: RAZER KRAKEN X Wired Gaming Headset User Instructions
Pingback: RAZER ISKUR X Ergonomic Gaming Chair User Instructions
Pingback: RAZER TETRA Wired Streaming Headset User Instructions
Pingback: Dometic CFX5 Series Mobile Cooling Instruction Guide
Pingback: Dometic CVI1350 Induction cooktop Instruction Guide
Pingback: RAZER KRAKEN X USB Gaming Headset Instructions Manual
Pingback: NOCO Genius 5 Manual | Easy Setup and Smart Charging Guide – Teatro a Brescia
Pingback: RAZER Universal Wireless Controller User Instructions %
Pingback: ADLER AD7750 Converter Fan Heater Instructions Manual
Pingback: ADLER AD 8151 Mechanical Bathroom Scale Instruction Manaual
Pingback: ADLER AD 3015 Plastic Sandwich Maker Instruction Manual
Pingback: ADLER AD 2270 Super Speed Hair Dryer Instruction Manual
Pingback: Labnet Enduro Gel XL Electrophoresis System User Manual
Pingback: VacMaster VBVB1223PF 1200W Wet and Dry Vacuum Instructions
Pingback: ADLER AD 8192 180 Kg Bathroom Scale Instruction Manual
Pingback: Labnet S2030-LS-B Orbit LS Low Speed Shaker User Manual
Pingback: RAZER THUNDERBOLT 4 Dock Chroma Instructions Manual
Pingback: Kohler K-1219-R 60" x 32" Alcove Bath Instruction Manual
Pingback: Kohler RXT Automatic Switch 100- 400 Amps User Guide
Pingback: Kohler K-28241-NKA Handshower & Wireless Speaker User Guide
Pingback: Blaupunkt AM 3000 PRO LED Lighting Instruction Manual
Pingback: VacMaster VP330 Chamber Vacuum Sealer Instruction Manual
Pingback: VacMaster VP680 Chamber Vacuum Sealer Instruction Manual
Pingback: Adler AD 1299 Stylish Glass Electric Kettle User Guide
Pingback: VacMaster CA0701UK EasyClean Home Floor Cleaner Instruction
Pingback: Labnet C2500 Prism Air Cooled Microcentrifuge User Manual
Pingback: Labnet H0600A ProBlot Hybridization Oven User Manual
Pingback: Labnet S2056A VorTemp 56 Shaking Incubator User Manual
Pingback: Ronix 8680 20V Brushless Cordless Grinder User Manual
Pingback: Adler AD 1908 Modern Digital PLL AM/FM Radio User Guide
Pingback: LEZYNE 72644 Aluminum Go PRO LED Adapter User Manual
Pingback: Hayward AQR15CUL Electronic Chlorine Generator User Manual
Pingback: NOCO Genius 5 Manual | Easy Setup Smart Charging & Fixes Guide
Pingback: Labnet C1000 MPS 1000 Mini Plate Spinner Instruction Manual
Pingback: Labnet PS1000 AccuSeal Plate Sealer Instruction Manual
Pingback: Ronix 8923 40V Brushless Cordless Chainsaw Kit User Manual
Pingback: ADLER AD2116 19mm 240 V Hair Curler Instruction Manual
Pingback: Ronix 2513T Electric Corded Screw Driver Instruction Manual
Pingback: Bosch PNK6B.K4.A Built-In Gas Hob Instruction Manual
Pingback: Bosch PCS7A.I9.A Built-In Gas Hob Instruction Guide
Pingback: AQUAPHOR ECO PRO Under Sink Water Filters User Manual
Pingback: Whirlpool WHGF 6534 X4UK Refrigerator Instruction Guide
Pingback: POWERTEC MP3427 Mains Power Adaptor Instruction Manual
Pingback: POWERTEC MB3776 500Wh Portable Power Station User Manual
Pingback: JANUS LTC-SM-FL Lobby Intercom Instructions Manual
Pingback: JANUS SHW-MRI-1 Machine Room Intercom Instruction Manual
Pingback: POWERTEC MB3764 12V 850A Jump Starter Instrcution Manual
Pingback: PROTECH CDM-600BW Freestanding Refrigerator User Manual
Pingback: JANUS ADA Telephone Line Powered Instruction Manual
Pingback: JANUS TX2000 Pantheon Wireless Keypad Instructions Manual
Pingback: Whirlpool W11651308C Dishwasher Instruction Manual
Pingback: Levoit LTF-F361-WUS Convenient Tower Fan Instruction Guide
Pingback: POWERTEC MB3914 8AMP Battery Charger Instruction Manual
Pingback: Adler AD 8083 Beverage Pantry 50w Instruction Guide
Pingback: Adler AD 4225 Hand Mixer INOX 800w Instruction Manual
Pingback: AQUAPHOR CRYSTAL Water Filters Instructions Manual
Pingback: AQUAPHOR 100 GPD Pressure Boosting Unit Instruction Manual
Pingback: PROTECH QP2288 Stud Detector with Laser Level User Manual
Pingback: Palmer Pan16 19“ DI-box, 8 channels passive User Guide
Pingback: Hama 00222239 JAMAIKA Weather Station Instruction Manual
Pingback: POWERTEC MB4106 3072Wh Power Station Instruction Manual
Pingback: Hama Freedom Light Bluetooth® Earphones Instruction Guide
Pingback: Hama 00220870 TV Floor Stand Bracket Instruction Guide
Pingback: Palmer Naab 2-Kanal Media DI-Box Instruction Manual - onyxguides.com
Pingback: POWERTEC QP2265 12V Battery Monitor Instruction Manual
Pingback: Whirlpool W10887806A Microwave Oven Instruction Guide
Pingback: AQUAPHOR RO-202S Reverse Osmosis System Instruction Manual - onyxguides.com
Pingback: Fisher & Paykal RS36W80RJ1 N 36" Series Freezer User Manual
Pingback: Fisher & Paykal VB60SMEI1 Vacuum Seal Drawer User Manual
Pingback: POWERTEC SL2380 Adjustable Reading Light Instruction Manual
Pingback: Makita TD004G Cordless Impact Driver Instruction Guide
Pingback: POWERTEC MB4102 1024Wh Power Station Instruction Manual - onyxguides.com
Pingback: POWERTEC 71766 Miter Gauge Fence System User Manual
Pingback: Palmer iller 1-Kanal Line Isolation Box Instruction Guide - onyxguides.com
Pingback: Palmer kyll 2-Kanal Line Isolation Box Instruction Guide - onyxguides.com
Pingback: Papago B100 High Definition Body Camera Instruction Guide
Pingback: Palmer ilm speaker simulation DI-box Instruction Guide - onyxguides.com
Pingback: PROTECH TS1475 40W 240V Soldering Iron Instruction Manual - onyxguides.com
Pingback: PROTECH QP6013 Temperature Humidity Data Logger User Manual - onyxguides.com
Pingback: PROTECH TS1465 25W Soldering Iron Instruction Manual - onyxguides.com
Pingback: ADLER AD 1907 Portable Digital Radio Instructions Guide - onyxguides.com
Pingback: ADLER AD 1304 Ceramic Electric Kettle Instructions Guide - onyxguides.com
Pingback: Insignia NB-WAFF15 Waffle Maker Instructions Guide - onyxguides.com
Pingback: Hama 00222238 Palawan Weather Station Instruction Manual - onyxguides.com
Pingback: ADLER AD 1038 Swingline Paper Shredder Intructions Guide - onyxguides.com
Pingback: PROTECH PP2147 Engine Code Reader Instruction Manual - onyxguides.com
Pingback: AQUAPHOR OSMO PRO 50 Water Filter System User Manual - onyxguides.com
Pingback: Palmer PAOCBXLRFXLR Female Audio Over Cat Box User Manual - onyxguides.com
Pingback: PROTECH TS1470 40W LEDs Soldering Iron Instruction Manual
Pingback: PROTECH TS1564 48W Soldering Station Instruction Manual
Pingback: Makita VC001GL Cordless Vacuum Cleaner Instruction Manual
Pingback: Palmer wupper Line Isolation Box Instruction Manual - onyxguides.com
Pingback: Makita TW001G Cordless Impact Wrench Instruction Manual - onyxguides.com
Pingback: Ronix 4120 Global Electric Jigsaw Instruction Manual - onyxguides.com
Pingback: VacMaster VFB511B Wet And Dry Vacuum Instruction Manual - onyxguides.com
Pingback: PROTECH 400N-BT 500N-BT Portable Speaker Instruction Manual - onyxguides.com
Pingback: PROTECH TH2630 Rechargeable Air Duster Instruction Manual - onyxguides.com
Pingback: Ronix 3250 180mm 2200 W Angle Grinder Instruction Manual - onyxguides.com
Pingback: Levoit LTF-F361-WUS Classic 36 Inch Tower Fan – Quiet & Easy
Pingback: Adler AD 6316 Air Fryer with Glass Bowl User Manual